
In Favor of Sumi
by Mathieu
This post is about the practice of laying out with ink. I love it and recommend it. If you are into timber framing and enjoy doing precise work it is worth giving it a try and see wether it will fit your scheme. The tools I have tried when doing layout on wood are scratch awls, markers, pencils, mechanical pencils and knives but when I was introduced to layout with ink (sumi) it certainly was a revelation. So far knives or pencils were my preferred weapons of choice and although I still use them for certain applications most of the time I use my sumisashi (bamboo pen) and sumitsubo (inkpot) to do accurate layout.

Learning to work neatly with ink can seem like a challenge but it doesn’t have to be. Without some basic instruction it is likely that ink is going to be all over the place, your hands and face smeared in black stuff. Your pieces of accurately dimensioned lumber looking like something that belongs in The Met amongst the collection of modern art rather then a cleanly layed out piece of wood ready for accurate cutout.
Above you can see the Chinese version of the same tools which I encounteredon a building site during my travels true China. Only one of the carpenters spoke some English and I wished I could have talked to them longer. Their work was a bit rough but they where obviously very skilled. The nice work they did with a limited tool set said more than words could have.

This carpenters square tells another story…

It may be one of the first things I have learned during my initial apprenticeship and I remember making accurate notes about it at night to make sure I could refer back to them later. I never did. I have never looked at any of those diaries and maybe it was the process of recording those teachings somehow seemed essential at the time.
Call me neurotic but it gives me a very satisfying feeling to draw fine clearly visible lines on a piece wood. The whole stick is layed out and I review what I have done in a attempt to eliminate mistakes, that unavoidably still seem to slip in somehow. I get excited to cut out the joints. Splitting, taking or leaving the line aiming for that near perfect fit.

So why would you use this method above any other? Here are my arguments:
- the lines are the finest
- they can be removed easily with a slight touch of a hand plane
- your lines are clearly visible
- the sumisashi edge is hard-wearing and remains fine for a long time
- the lines drawn do not disolve with water
- and most importantly; it is just very pleasant to use

Try to erase a pencil line on a piece of wood and you are guaranteed to make a mess, mar the surface or leave a scratch if you use a hard pencil. Instead a light stroke with a handplane will remove an ink mark and leave a clean surface to continue from. If you snap line with a chalkline or use a fat pointed pencil I always wonder where on this 2mm thick line it is you want to cut? It remains guessing at best. The joint will either be too tight or fit like a dick in a bucket. (This is an official English timberframers expression) And since none of the above could possibly be what we aim for we are in need for a fine and neat way to mark our timbers for cutout.
Avoiding Frustration
I have noticed that some sumi easily turns the silk wadding of your sumitsubo into a rock. This can be really frustating since it takes forever before your sumitsubo is usable. It has to soak all night and would still remain more difficult to use. At first I was under the impression that somehow acrylic might be mixed into it and causes the hardening of your wadding. I recently learned that some sumi sticks are made by mixing charcoal or soot with animal protein glue and this explains exactly the situation described. So what you are actualy looking for is higher grade caligraphy ink made of charcoal.
You can grind your own sumi from a stick but this takes time. Once upon a time I enjoyed gently grinding the stick of sumi until you get the perfect consistency of ink. I soon found out that I rather spend time on other things than preparing sumi, how meditative it may seem. These days I use prepared ink and I tend to choose the higher quality that is used for calligraphy, also here the lower quality ink contains additives such as gum which is undesirable. If you do choose to grind your own make then don’t make it too thick since it will not run as smoothly from out between the fine cuts you made in your sumisashi.
You need a lid.
Really, a lid for this inkpot, why?
Sumitsubo don’t come with a lid if you buy them. However if you plan to make your own sumitsubo (note the hint) make a lid as well while you are at it. One of the key things to work neatly and accurately is keeping your inkwell clean. There is plenty of dust traveling through the air in a carpenters shop that loves to settle among your sumi and then in turn sticks to your sumisashi. A lid will prevent this but it will also keep it from drying out during the dry season. During sumitsuke (layout) it is your main tool and you get accustomed to keep the right amount of water and ink in there. Make it too wet and things will be a mess but in general you should be adding more water than ink.
Wrap the silk wadding into a piece of cloth this helps to prevent fine strings of it getting stuck onto your sumisashi. I use a piece of old silk underwear that was in the rag bag at the workshop. I am afraid it used to belong to my boss to keep him warm during the winter. Why am I writing about my boss’s underwear?
Like many good things in life it takes some time and practice to become proficient in it. If you don’t want to bother investing some of your time and effort that is just fine too, you can stick with whatever works for you but you might be missing out on a very practical method. You have learned to eat properly with knife and fork so I am sure you can manage to learn laying out with ink. It’s a matter of good habits and muscle memory and the sumisashi will become an extension of your hand.

Here is another provocative statement.
Laying out with a sumisashi and ink is the superior method for timber framing layout.
There you have it, I said it. Maybe you are a furniture maker and believe that a bamboopen is going to be annoying as hell. In that case try a Pilot hi-tec pen. These things are great I was sold from the first moment I tried one. A carpenter and friend of mine Mike Laine gave me one while we were building a house in Nicasio CA. It is a superfine gel ink balpoint pen and brings together the best of both worlds. You have the advantage of ink but don’t have to carry a sumitsubo around to supply yourself with fuel. You can’t drop them on their tip, it ruins them so I always have at least one spare one in my toolbox. The thinnest are 0.3mm so if you are in need for a finer line you need to stick with a sumisashi instead. They come in many different colors which is often handy but only the black ones don’t run out when your marks get wet.

Tricks of the Trade
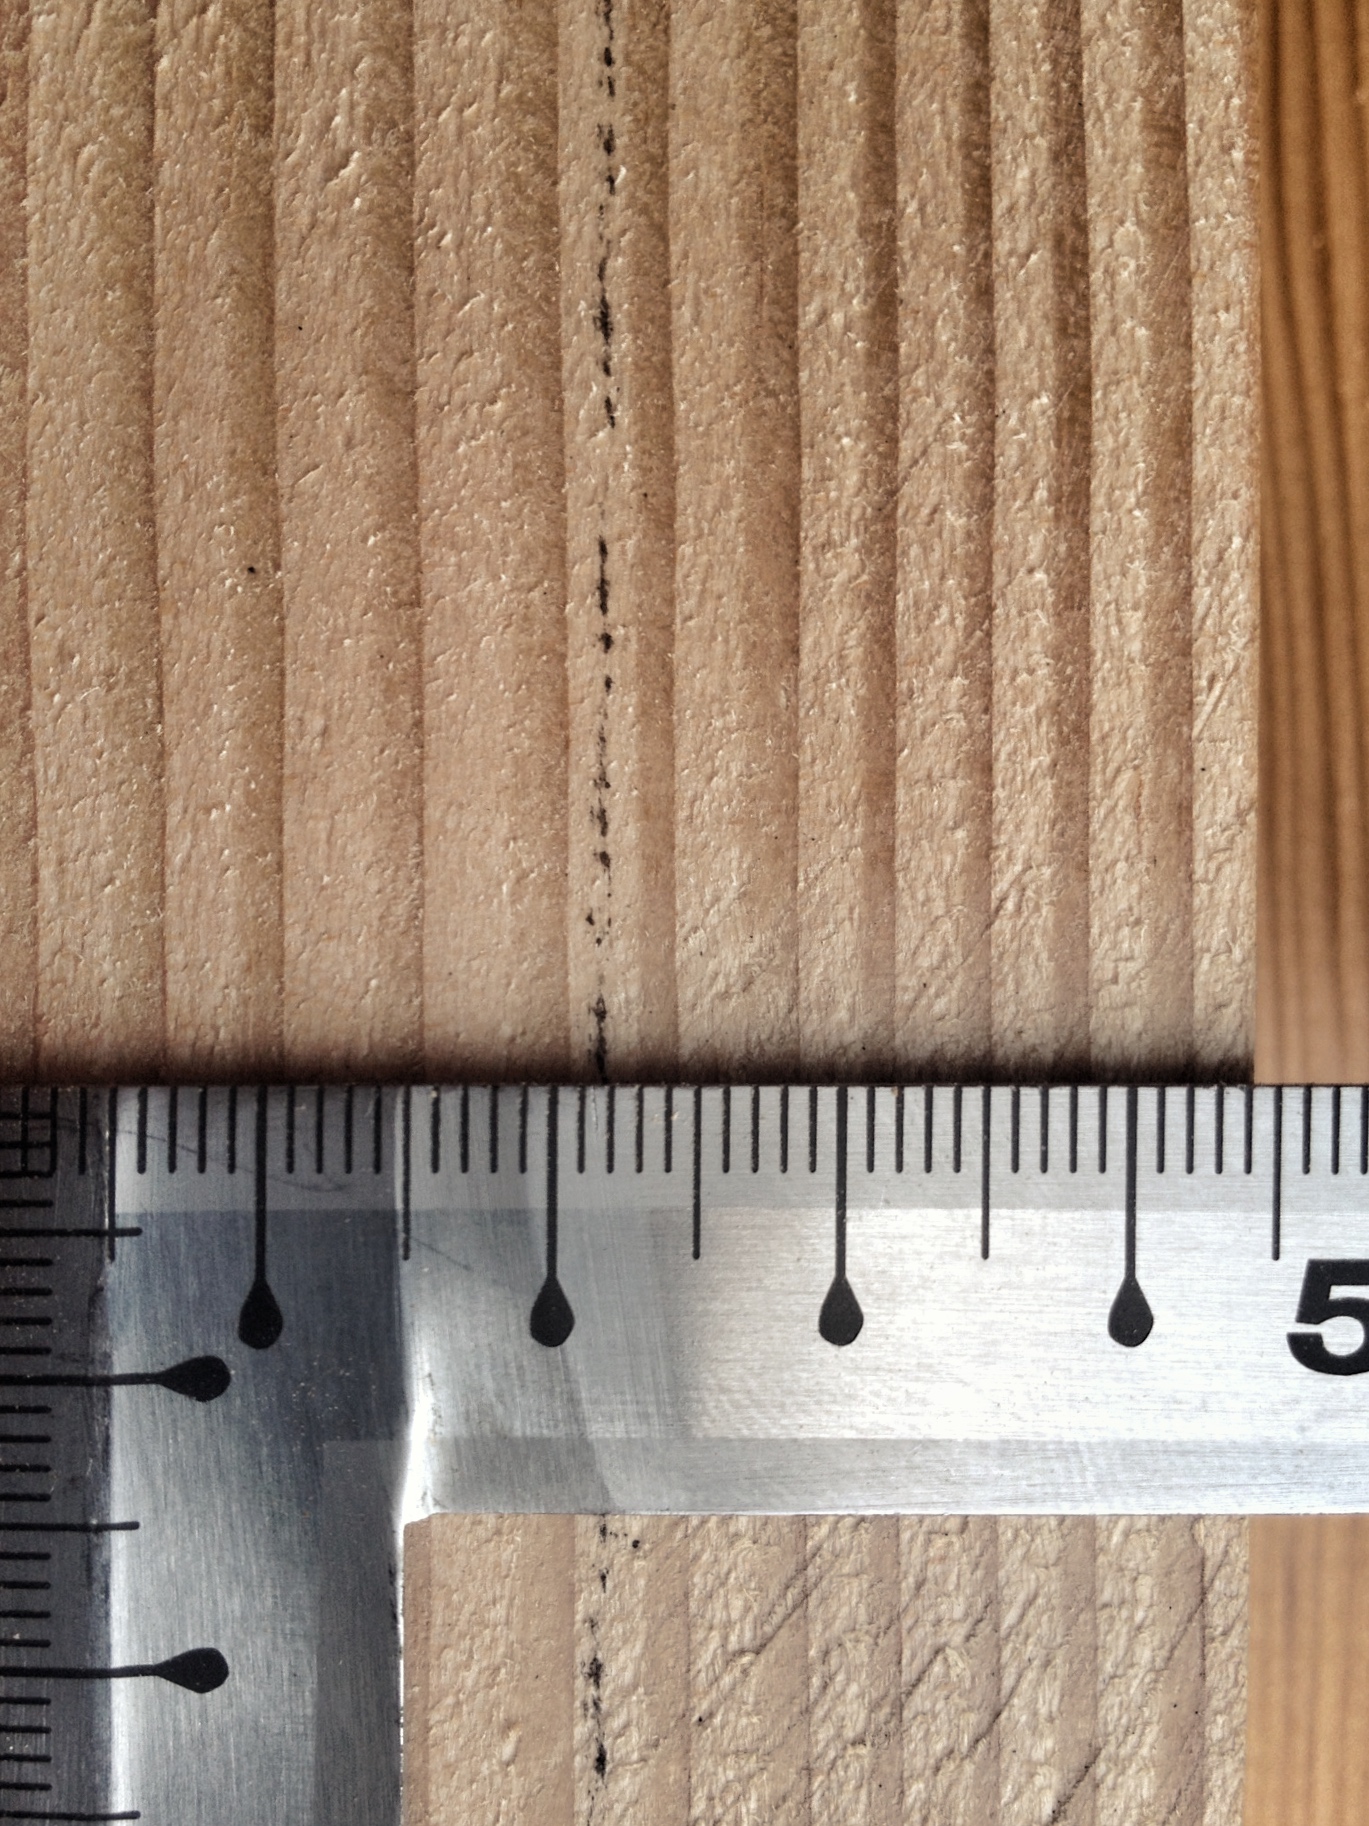
When accuracy is an utmost must the ink line can’t be too wet. It will splatter or mark a thick line (see the picture above with the layed out mortices). Take a small piece of sponge and fit it into your ink-container just in front of the hole where the line leaves the well. You will note that it helps too keep just enough ink on the line. The picture below shows a clear and thin line about 0.2mm wide, accuracy guaranteed.
Every morning after brushing your teeth clean your bamboo pen and make sure it is sharp and has no dust on it’s edge. If the edge isn’t sharp you just grind it on your #4000 stone take of the burr and it is as good as new.
So in order of preference I choose sumisashi, hi-tec pen and a HB pencil. Knives take a seperate place since they remain indispensable in many occasions.
I was planning to write a post on how to make your own sumisashi but then I found this film instead. Here is a link to some nice footage about how to make a sumisashi or bamboo pen. I really enjoy these little films, they make me want to go straight back to work instead of sitting behind this computer screen.
Pamflets with instructions for laying out with ink have been printed and are being dispersed as we speak. They will be dropped out of airplanes over the western world over the course of the next week. Get your hands on a couple of them and send them to your fellow carpenters if for some reason they have missed this propaganda.
∴

Mathieu,
Would you consider writing something about the actual sumisashi? There is plenty of information in the books on Japanese joinery, but not really anything on how to go about laying out the male and female parts in an orderly fashion.
Same with the actual usage of a Kanna. Most information in books and on the web, at least for those of us who don’t speak or read Japanese, is about the initial setup of the blades and sole, which is fine in itself, but doesn’t really translate into using the Kanna effectively:
For Western dimensioning and prep with saw and plane, and methods of layout there is plenty of information available. There is almost close no zero information on the Japanese ditto, and I sometimes think that’s what keeping a lot of people from actually beginning to use these highly effective tools.
I have converted to sashigane and kanna for all my woodworking, but only through a lot of thinking and experimententation on my own. In reality, I would much rather have seen demonstrated an effective and consistent way of doing things.
Would you consider posting something on layout and the steps in prepping/dimensioning before layout? I am sure that it is something many more than I would benefit from. (And it would be nice to reclaim Japanese Carpentry from the mysticism and b.s)
Thanks
Henrik
LikeLiked by 1 person
Hi Henrik,
Thank you for your comment and suggestions. This blog is certainly about demystifying traditional carpentry and animal-excreta is certainly not on my to-do list.
There is a lot to be said about all these subjects and it is not always easy to put it into words. Honestly I would rather show someone how to do something then to write extensively about it. On the other hand I understand that there is a need for better information and I will certainly think about your suggestions and see how I can go about it.
Japanese planes (kanna) are a whole world on their own and you could easily write an entire book about their use and setup. If you are a beginner there are two main things to keep in mind when you encounter problems.
One is sharp. Is your blade still sharp enough to tackle that difficult grain? In case of any doubt sharpening it again. The hardest part of sharpening is removing the burr well. Ok now you want to know how to do this…
Two is dai. Check the sole of the block. If everything looks good and it is still not working, check it again. It is easy to overlook something and always keep in mind that the slightest thing can trow off the performance of the plane.
This might have raised more questions then providing you with answers.
Good to hear you have converted and use some Japanese tools. They are not better then others but certainly are well made, perform at least as good and are pleasant to use.
Regarding doing the actual layout itself it certainly is something that comes true practice. I will think of a way to dedicate a blog post about the subject and try to integrate it in the next entry. Hopefully it will clarify things a bit but don’t hesitate to ask more questions here in the comment section if something remains unclear.
LikeLike
Hi Mathieu,
Thanks for your kind and informative reply.
Yes, my learning experience has been the same, and I can now get my kanna to work fine for my work (though there is probably a certain sphere of super-thin bliss which they will never attain).
I actually think there is a lot of good information on tool setup already out there. Odate and Desmond King’s books are informative, and Chris Hall has the mother-of-all posts on fitting the blades and setting up the dai.
My doubts begin approximately there – how to go about dimensioning a four-by or panel before layout:
A few short pointers are mentioned by Hideo Sato in The Complete Japanese Joinery, and bits of information are found in Len Brackett, in Coaldrake and in Moorsoft’s Japanese Homes and their Surroundings.
I have tried building a “system” from that but, like much D.I.Y, it’s rickety and prone to slow going.
Now, we have mailed back and forth a few times about the hip rafter workshop. Certainly, I would definitely agree that such complex operations are best learned with an instructor.
What the world at large might benefit from some in-depth writing on the initial processes is two-fold:
– First, it might enable someone like myself to become more proficient, more selfreliant and, ultimately, able to perform layout fast and repeatedly, which would free up energy and time at the workshop to absorb the finer points of complex layout.
– Second, it might shift public interest in Japanese carpentry from the fixation on tools. And tools as something to be used rather than fetishized (“Samurai Steel!).
Which might convert even more people, because they are really just very effective tools:
I can (proudly) tell you that I have just felled, bucked and ripped into lumber, 30 biggish trees (including some big maple and oak) only using an axe, wedges and a anebiki saw. Marking up was done with sashigane and sumitsubo.
I would never have gotten through the pure physicality of the task with Western saws.
Similarly, working only with hand tools, I feel that I save a lot of effort prepping with a kanna over my jack and jointer. I can easily work all day.
That’s why I was so happy today, when I saw that you were beginning to write about the sumitsubo. Just give us more! Because I guess there is only you, and Chris Hall, writing in English from a point of training and extensive experience. And you are doing us all a great favor.
In other words, keep up the good work! I, for one, am definitely paying close attention.
Hope to see you this summer in England
Best
Henrik
LikeLiked by 1 person
I carved my own sumitsubo years ago. Unable to contrive a crank handle, I opted to just fix the line reel with a tapered pin, and roll it along the timber. Works so well, I assume there’s precedent. Less luck with the sumisashi; marking along the square left ink which transferred to hands, etc.
Plunging in with a general idea sometimes leads to deep frustration (or poor practice). Details, technique, finesse coming from the experience of someone like yourself are invaluable. Thanks for sharing.
LikeLike
Hi Michael,
Thanks for your comment. The crank handle on sumitsubo are a relative new addition and with most of the antique models you just use your hand to roll the reel.
The creating-a-mess issue is often related to snapping lines and doing layout at the same time. When you snap the line inevitably your fingers will be inked from pulling the string. As a result fingerprints all over the place. I usually snap the lines on all the timbers lined up for layout and then start drawing cutlines with the sumisashi and square. It is easier to remain clean this way. A cloth is never far away either and I might wash my hands quickly if needed.
Would love to see a picture of your selfmade sumitsubo.
LikeLiked by 1 person
Small photo at the bottom of this: http://michaellangford.org/2013/01/24/japanese-ink-line/
I actually use the bamboo pen to hold line tension while rolling the ink pot like a toy truck along the timber. It’s fast and clean.
Mathieu, I have long admired Len Brackett’s work, delighted to see that you are somehow a continuation of that. I noticed that you are using what appears to be Chris Hall’s book in your joinery class, so I assume that there is a connection there since you both do such impeccable work. Michael
LikeLiked by 1 person
Hi Michael,
That is a nice sumitsubo, unusual but finely shaped.
I am grateful to Len for all he has done for me, I hope to keep working with him for a very long time. There is a lot to learn. Always and forever…
I am familiar with Chris Hall’s writings but I don’t use them for any classes I teach. I have been taught by Ryosei Kaneko about Japanese roof geometry and his methods of explaining things are very complete but minimalistic. By that I mean that all information you need to solve a specific problem was provided but very little explanation was giving. You are pointed in the right direction but you are on your own.
It worked very well for me and I try to share some of the things I have learned from him in a comparable way. It forces someone to come up with your own answers. You are really challenged and train your brain to work in a specific way geared towards geometric problem solving.
All the text and illustrations I use during courses I have made myself and are not copied from anywhere else. I do refer to many books (mainly Japanese) when I study and have also found Chris’s writings helpful along the way. His work is certainly inspiring.
LikeLike
Switching over to ink was a revelation for me! Dramatically easier to see than a pencil line. I use a mix of sumisashi and pens in my shop. Depending on the size of the layout at hand. I much prefer the sumisashi though. It’s an absolute joy to use.
This is a great writeup. Nicely done!
LikeLike
Hi Greg,
Thanks for your comment. Good to hear that you like it so much.
LikeLike
I’ve been looking skyward for a few years now and still no signs of the leaflets.. Been shat on a bunch, though. 🙂
I find it interesting layout was one of the first techniques taught to you as an apprentice, (it would seem like a logical thing, given you would be expected to be able to read the marks and cut to them as well as make them) and yet there is virtually nothing written about how to ACTUALLY DO the layout in the english-speaking Japanese Woodworking world – other than describing the tools and how marvelous they are. Your post, for example, is the first place I have read tips on maintaining ink consistency and controlling spatter, so thank you so much for that!
I wish something would be written about even BASIC layout symbols and techniques. I’ve asked several people (including you, I think), and the general response was, “Since you are not in Japan, it doesn’t really matter, use whatever symbols you’d like”. But obviously, there are conventions.
For example, in the picture you posted, some of the mortises have different marks at the corners – dots vs. slashes. Why? I’m assuming it’s because some are stopped (blind, or haunched) and others are through. But which ones? How do you know how deep to make the blind ones? Why does the slot on the right have two “hashmarks” while the one on the left doesn’t? What does the number mean? I mean, I could take educated guesses on these things, but geez, it would be a lot less tedious if someone who knew would just write something down. And this appears to be a simple joint – I have seen way more complex markings on timbers in photos and videos – very elegant and economical layout marks conveying lots of information – no clue how to read them. I’ve even tried purchasing Japanese carpentry books FROM Japan, and there is hardly anything in them about layout symbols – well, at least that I can decipher, not being able to read Japanese!.I’m either choosing the wrong books or the information is so basic it doesn’t even bear repeating (how many English speaking woodworking books tell you how to actually DO layout, use a square, etc. Not many).
To me this is WAY more frustrating than getting ink all over my fingers!
LikeLiked by 1 person
Hi Durbien,
Well you sure threw down the gauntlet there. You have a very viable point and this information gap is something I have been aware of for quite a while. I also have very specific ideas how to fill up this gap. However for now I am afraid that I will have to satisfy you by giving away small bits of the puzzle.
Let’s start with the marks depicted on the picture. Your educated guess was indeed correct. To mark a mortice you can either use a slash, dot or a curved line connecting the two nearest corners. Here I used the slashes to mark a through mortice. The dots for a stopped mortice which is 31mm deep. The hashmarks are the number 11 and again indicate the depth in mm. As you already point out there is a lot more to be said about it. But to explain the whole system n a comprehensive way we should actually start at the beginning. Explore centerline layout and why it is used. How it relates to the building as a whole etc.
I hope this explanation has eased your sincere curiosity but you will be able to learn much more about it in the near future. That is a promise..
LikeLike
Hi Mathieu and Durbien,
YES! What Durbien said, That’s what I wanted to say.
Thanks Durbien for being so much clearer in your question:-)
Yes, center line layout – here we go.
And thanks Mathieu for picking up the gauntlet. It’s needed and appreciated
LikeLike
Hi Henrik,
Somehow I missed your comment so I am sorry for the late reply. Felling and milling that lumber sounds like a lot of fun. It puts a smile on my face when I read about it.
I can only agree with every point you make. Indeed Chris Hall’s post on kanna setup (or anything else for that matter) are very wel written and some of the best material out there on the subject.
I also agree that shifting away from the Japanese tool fetish would be a good thing. It really is about the work we perform with our tools, any kind of tools in that regard. I like my tools and take good care of them since it is just good practice I suppose but being fixated on an object that is meant to get something done is not my cup of tea.
I look forward to meet you in person and continue the conversation. As I said before in my reply to Durbien’s comment I can assure that I am working towards a way to make all this information available. “The great aim of education is not knowledge but action.”
LikeLike
Thanks Mathieu for your kind reply.
I think you should then put it in some kind of paid-for format (book/ebook). I, for one, would happily do so.
All the best,
Henrik
LikeLike
Thank all of you for the comments. It motivates me to do more of the same and to do it better as well.
LikeLike
Hi !
Love to learn next to you Mathieu, this entry was wonderful since I now am getting used to the sumitsubo and sumisashi and I really like this method of laying out. Your effort sharing this blog is incalculable.
Some japanese friends of mine showed me the sumisashi video some time ago it is very helpful.
I have to say: Domo arigatou gozaimasu !!!
LikeLiked by 1 person
Hi Hayabusa,
Thank you for the nice words!
LikeLiked by 1 person
Hey I am Julio Alonso by the way hahahaha
Cheers !
LikeLike
Hey Mathieu,
I love working with sumisashi and sumitsubo. I cant imagine using anything else. Thank you for introducing the hitec pen. I have never tried one but it seems like it would come in handy. By the way I love that little structure you will be building. If I was closer I would love to give you a hand. All the best
Shawn
LikeLike
Hi Shawn,
Good to hear from you. Try out the hitec pen’s I think you will find them useful for some applications. Maybe one day we can collaborate on a project somewhere..
LikeLike
Hello Mathieu, I will order a few right now. It would be fun to collaborate and I look forward to that materializing. I will be closer to you in the next few years if we decide to move back to Germany. All the best
Shawn
LikeLike
Thanks for the explanation, Mathieu. Of course it all seems so obvious to me now, perhaps that is how it was for everyone else. But I certainly appreciate it.
I wasn’t really “gauntlet throwing” – just frustration boiling over I guess.
If I offended (anyone) please accept my apology.
BTW, I hope you don’t think I”m demanding that you give away this information. If you wrote a book (or even a magazine article) on it, I’d certainly BUY it.Hey, maybe you could publish your apprentice’s notebook – that way you could get some use out if it! 😉
Darrell
LikeLike
Hi Shawn. You are talking about sharpening stones and testing them right?
LikeLike
Hi Darrel,
Don’t worry no offense was taken! I took that comment very positively and I can only appreciate suggestion.
LikeLike
Wow, I just stumbled across this amazing blog today, like I similarly did on Chris Hall’s a few months back and have been devouring the information. I cannot help but second everyone’s comments for additional information on Japanese ways. I will gladly pay as well, the long eastern traditions are much more appealing to me than the modern western ways that are written about at length. I trust what has been done for thousands of years and enjoy the way Japanese tools are used. Apprenticeship instruction is what is lacking these days, I find it near impossible even to find an decent apprenticeship program as I would love to take it. As far as “showing” rather than writing goes, perhaps short videos would be helpful…again paid subscriptions are well within reason! Thanks again for sharing your knowledge, it is VERY much appreciated and longed for, I am just seconding the opinions already shared.
LikeLiked by 1 person
Hi Jonathan,
Thank you for the encouraging words, hope to see you here more often!
LikeLike
Hi Mathieu!
Nicely written article. I like to use sumi for marking the line to which a plaster should go as well. Apparently the tradition is black ink for carpenters, red ink for plasterers. I’ve yet to push its use in my plastering work in the West (except for one tricky wall recently in the monastery project — used a chalk line, but it sufficed). Thanks for the reminder of the wonders of sumi!
LikeLiked by 1 person
Hi Emily,
Last night I just read about the use of sumitsubo in your book about Japanese plastering.
The red ink is called bengali which means oxide. It is a pigment made of red colored iron oxide and is often used by sukiya-daiku (teahouse carpenters) on natural round logs. In contrast to black sumi which is waterproof, bengali can easily be washed of with some water. This way a line can be snapped on a surface which has already been finished planed and washed of afterwards leaving a clean surface.
There is also the orange ink version that is sold prepared in bottles and this is permanent ink which can not be removed with water.
LikeLiked by 1 person
Mathieu,
I was speaking about doing a building project in the future. It would be fun! I am also always looking to try new stones : ) all the best
LikeLike
Sure, sounds good!
LikeLike
Thank you for the post. It’s filled with invaluable tips and hints. I too carved my own sum, but I didn’t have parts small enough to afix the crank to the shaft pin. I opted for a crank less version. I also inserted a couple of Teflon bushings on either side of the wheel to keep it true and centered. I want to insert another piece of Teflon into the hole. I use my drill press as a lathe and ought to be able to form one. I modify a small finishing nail to use as a substitute bit.
I have heard a little known bit of info that a few of the masters have turned to fishing line to mitigate any problem with ink splatter and lines too thick. Can you confirm whether this is true or false?
LikeLike
Hi Baruch. Thank you for your comments. Teflon bushings sound like a nice upgrade. I will consider the option next time I make one. I have been using very fine dyneema fishing line for a while now and prefer it ever since. It doesn’t mitigate ink splatter as much as a piece of sponge in front of the line exit hole. The dyneema doesn’t absorb so much ink and therefore helps in marking a very fine line.
LikeLike